
The Consequences of Poor Air Brick Installation and How It Reflects Broader Site Management Issues
- TUFSM

- Jul 1, 2025
- 5 min read
Updated: Jul 27, 2025
I have been visiting numerous sites recently. One of my primary concerns as a site manager was the installation of air vents at inadequate heights and not following standard details regarding external raised ground level drawings. This issue is particularly significant to me because, during one of my first projects involving new houses, I was unable to obtain the completion certificates from building control. The building control inspector rejected the homes due to the air vents being buried at the time. Consequently, I found myself manually excavating these air bricks with my hands.
In my previous role with the Council, I received training in preventing rising damp, a skill that has remained relevant throughout my construction career. The problem one new builds was not only the low placement of air bricks but also the improper installation of damp courses.
Due to my expertise, I consistently reviewed the external level drawings. The technical engineers specified that, in accordance with Part M regulations, the ground at the front doors of properties must have a level threshold. This requirement necessitates raising the air vents by one course or 75mm from the level threshold, along with the addition of a secondary DPC. The level drawings are always explicit, clearly indicating the need for a raised DPC in areas where external levels are less than 150mm below the finished floor level, such as flush entranceways.
Recall my earlier post building to drawings if you can read, then you can interpret a drawing. This serves as a clear illustration. It is a color-coded drawing annotated in English.
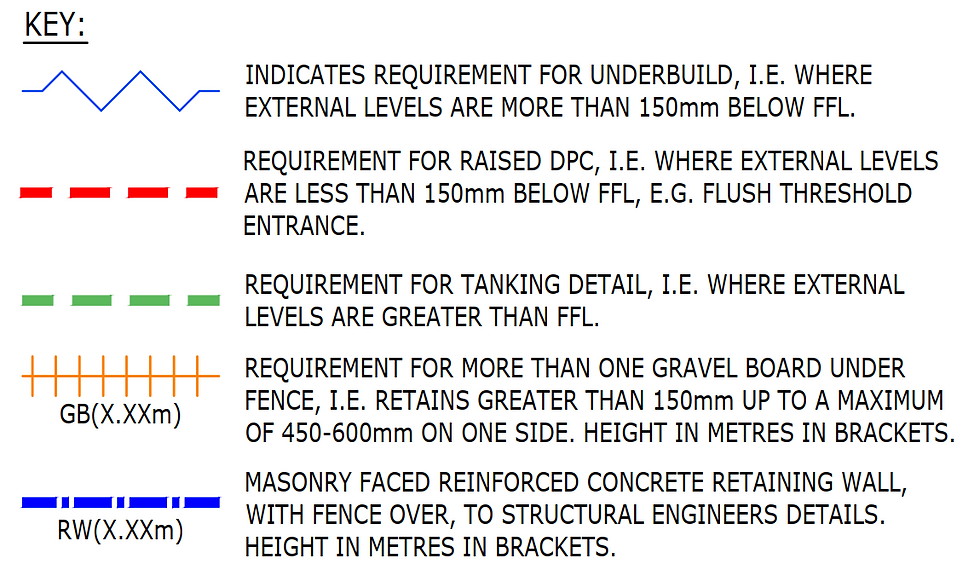

Where the technical team has indicated a need for a raised DPC, a standard detailed drawing will also be provided, illustrating an air vent positioned 75mm above the level threshold at the front door. Presented below is an example of an external wall with elevated ground standard detail. This detail would apply to all the dotted red lines above. The ground level is marked as GL on the drawing below.

The photos below illustrate my inspection of the work on-site after the ground workers completed the brickwork below the DPC level. It is evident that there are missing air bricks, some are installed in incorrect locations, and others are positioned too low.

One of the primary reasons this fundamental issue is consistently overlooked is due to the installation of damp courses and air bricks aligning with the scaffold base. When builders fail to reference the level drawings during construction, they often do not consider the finished floor level after the landscaping of gardens. Landscaping may involve elements such as plants, turf, and paving, all of which are potential factors that could compromise the damp proof course (DPC).
You may wonder how Building Control is approving these properties when the air bricks are not installed at the required 75mm above the threshold. This is because contractors are lowering the ground levels during the final stages of completing a plot. This process poses significant challenges for the ground workers, as they must redo their initial work and remove additional soil to adjust the levels. This adjustment is necessary to accommodate the 150mm topsoil, MOT, and paving requirements. Many contractors are installing French drains or shingle strips, to address this issue; however, it remains uncertain whether this solution will effectively prevent rising damp.
I have recreated the Part C Damp Proof Course Height to the best of my understanding. Part C regulations clearly state that the DPC needs to be 150mm above external ground level.

While their efforts will provide some assistance, the practice of lowering levels without appropriately addressing the height of air bricks and damp proofing can inadvertently create additional issues. Specifically, reducing levels in soft landscapes can lead to water pooling beside the house, as proper drainage is not being installed. This situation can result in unintended water accumulation near the house, for which the structure and foundations were not designed. Additionally, the void beneath the homes is not being adequately ventilated because the air bricks are positioned too low and are often obstructed by plants, driveways, or paving.
Some photos I took this past week.


I am not a specialist in damp issues, but I find it challenging that this particular detail is often misunderstood. When I first encountered this problem on one of my sites, I had to address a group of 20 operatives, explaining that they had incorrectly constructed 500 homes on the same site. They struggled to grasp the detail, specifically that the periscope vents at the threshold level in the front required most of the properties to be built one course of bricks higher. One individual did understand and approached me after the meeting, questioning why others were having difficulty comprehending this and why they were giving me such a hard time. I am aware of the reasons, but I will not delve into that at this moment.
I called the company that makes the periscope vents today and asked if there was any guidance for clearance in front of vents. The lovely lady on the phone today confirmed we just ask people to build to building regulations. But what are the consequences for the air flow not being what it needs to be as the air bricks are being installed too low.
I would like homeowners to go outside and have a look at their DPC levels and their airbricks if the air bricks are too low if they’re covered, if your DPC is potentially compromised by soil levels there is a potential for you to get rising damp. Especially if you have had internal cavity wall insulation installed. The soil in the cavity should be 255mm below the external Course. I can honestly say with all the checking that I did I didn’t check this. I’ve only learnt this by looking at the Part C Building Regulations 2010 yesterday. I would’ve checked it if I had known I needed to, but i never knew this nuance until yesterday.
Again I have created my own version off this detail. The purple arrow now shown on this plan is where the cavity depth should be a minimum of 225mm below the internal and external DPC height in the brick or blockwork.

If you have cavity wall insulation LINK INCOMING installed in your home, you cavity it’s meant to be clear, to allow moisture to fall down below the DPC as shown in the drawing below. When cavity walls are constructed with wall ties that have drips in the middle and the drips are designed that if the water does penetrate into the cavity it will go along the wall ties and drip down the cavity into the void but this doesn’t work when you have cavity wall insulation.

I am seeking several newly built homes to inspect at no cost. These homes should have been purchased within the last two years and still be under the builder's warranty. I would like the opportunity to communicate directly with the builders on behalf of the homeowner to request standard details, level drawings, elevations, truss layouts and material specifications to perform a thorough inspection.
The primary purpose of this blog post is to raise awareness and help homeowners prevent rising damp on new build homes. If site managers are not adhering to standard procedures, such as raising air bricks when external levels indicate the need for a second DPC, what other drawings might they be overlooking or failing to follow?
One of the most concerning aspects of the above issues is that rising damp often does not manifest as a problem until well after the expiration of your builder's warranty and insurance guarantee. Individuals are investing significant amounts in new constructions; therefore, addressing this fundamental concern early on can provide substantial benefits in the future. Please be careful and check this before it becomes a major problem.


Comments